
Use Image Scanner when a Salesforce user must intentionally submit one image, or an ordered Front and Back pair, from a record page. The component can also collect optional notes for the agent.
Image Scanner uploads each image as a private Salesforce File. When the user selects Submit, it attaches the selected Front and optional Back to the current record and publishes one IMAGE_SCAN_SUBMITTED event. The provided Flow sends those images, notes, and related record to one background iDialogue agent run.
Choose the correct file-processing method
| Method | Starts processing when | Files per request | Best use |
|---|---|---|---|
| Image Scanner | The user selects Submit | One Front image and an optional Back image | Guided image capture with optional instructions |
| File OCR with Run Agent | A file is attached or a file event matches | One file from each matching event | Automatic processing of ordinary Salesforce File uploads |
Keep existing file-processing Flows
Existing CONTENT_VERSION_INSERT handlers can remain active. For a handler that processes files on a business record, use the event fields below. Select All Conditions Are Met (AND) and replace Account with the intended object API name. No Get Records step is needed for these conditions.
| Event field | Operator | Value |
|---|---|---|
Event Type (rooms__Type__c) |
Equals | CONTENT_VERSION_INSERT |
Related Record Type (rooms__RelatedRecordType__c) |
Equals | Account |
Related Record ID (rooms__RelatedRecordID__c) |
Is Null | False |
The scanner's private upload still creates a CONTENT_VERSION_INSERT event. Its related business-record fields are blank, so it does not match these conditions. Its Origin remains apex; only the later IMAGE_SCAN_SUBMITTED event has Origin imageScanner. Adding the record link at Submit does not insert another ContentVersion. Use the original event fields even if the Flow receives the event after Submit. Later links do not change those fields. Do not query the file's current record links to replace this event context.
Blank related-record fields do not identify the scanner. Other private uploads and Library-only uploads can also have blank fields. Keep explicit Library and folder conditions for handlers that process Library files.
Salesforce File Attach handlers are separate. They can run when Submit attaches the selected images to the record. Review their conditions so they do not process the same images again. This feature does not add a scanner-source field to native File Attach events.
Before you start
Complete these requirements:
- Install an iDialogue package version that includes Image Scanner, the Image Scanner Event Handler Flow template, and the Supporting Content Version ID input on Run Agent Action (AI).
- The package must include private upload followed by attachment at Submit. Earlier scanner versions attach files during upload; the blank-related-record filter does not exclude those uploads. Upgrade before using this procedure.
- Configure an active iDialogue connection with available usage capacity.
- Configure the intended agent with a Background Model and the required All or Background instructions and tools.
- Give the administrator permission to edit Lightning record pages and create or activate Flows.
- Assign end users the iDialogue User permission set, or equivalent access to
ImageScannerController,RunAgentAction, and the iDialogue Platform Event. - Give end users permission to read the current record, upload and read Salesforce Files, and attach them to that record.
- Give the Salesforce connection user the permissions required for the agent's downstream record actions.
Use a sandbox or test record first. Use an agent whose expected actions are safe and visible.
Add Image Scanner to a Lightning record page
Image Scanner is a Lightning Record Page component. It is not a component for a traditional Salesforce page layout.
- Open a record for the object that needs image capture.
- Select Setup, and then select Edit Page.
- Find Image Scanner in the custom components list.
- Drag the component to the intended region of the Lightning record page.
- Configure the component properties.
- Select Save.
- Select Activation and assign the page to the intended org default, Lightning apps, record types, and profiles.
For more information about page assignments, see Activate Lightning Record or Home Pages.
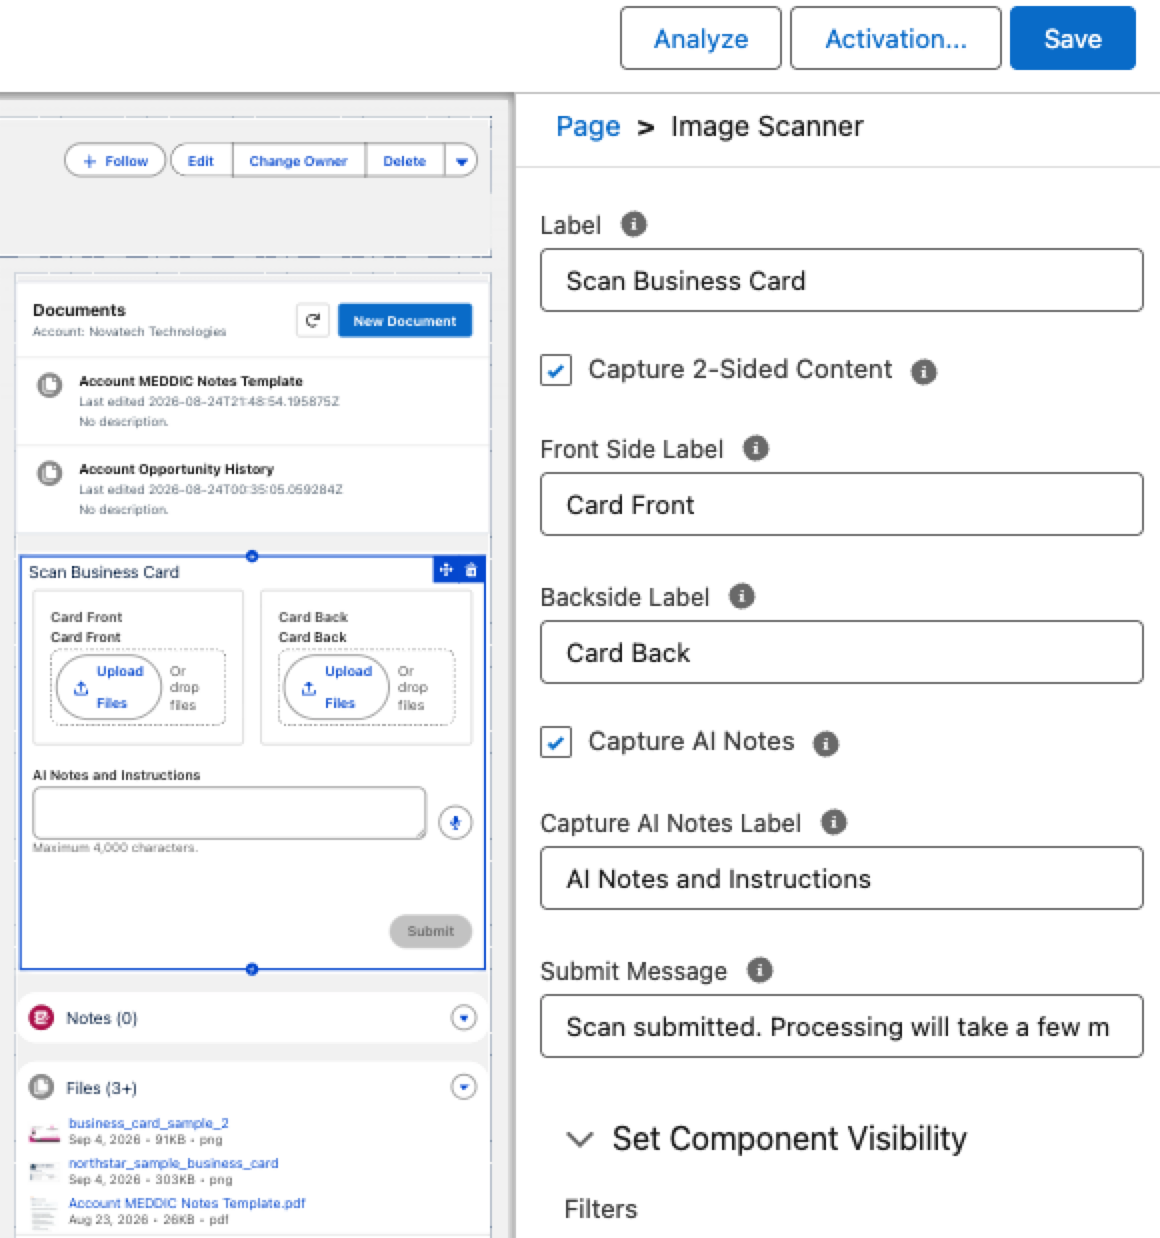
Add Image Scanner to a Lightning record page and configure the labels and capture options.
Configure the component properties
| Property | Default | Behavior |
|---|---|---|
| Label | Scan Image |
Sets the component heading. |
| Capture 2-Sided Content | false |
Shows a separate optional Back image when selected. Leave clear for one-image capture. |
| Front Side Label | Card Front |
Labels the required primary image. This image remains the primary file in a two-sided scan. |
| Backside Label | Card Back |
Labels the optional supporting image when two-sided capture is enabled. |
| Capture AI Notes | true |
Shows the optional notes field and a microphone when speech recognition is available. |
| Capture AI Notes Label | AI Notes and Instructions |
Labels the notes field. |
| Submit Message | Scan submitted. Processing will take a few minutes |
Sets the receipt shown after Salesforce accepts the submission event. It is not a completion message. |
Blank text properties use the installed localized labels. These properties change only the component display. They are not included in the platform event and cannot route submissions to different agents.
For a business card, a typical configuration is:
| Property | Example value |
|---|---|
| Label | Scan Business Card |
| Capture 2-Sided Content | Selected |
| Front Side Label | Card Front |
| Backside Label | Card Back |
| Capture AI Notes | Selected |
For a receipt or photograph, clear Capture 2-Sided Content and give the Front image a use-specific label.
Configure the Image Scanner Event Handler Flow
The provided Image Scanner Event Handler is a platform event-triggered Flow template. Its path is:
iDialogue Platform Event
  -> IMAGE_SCAN_SUBMITTED Event?
      -> Run Card Scanner Agent
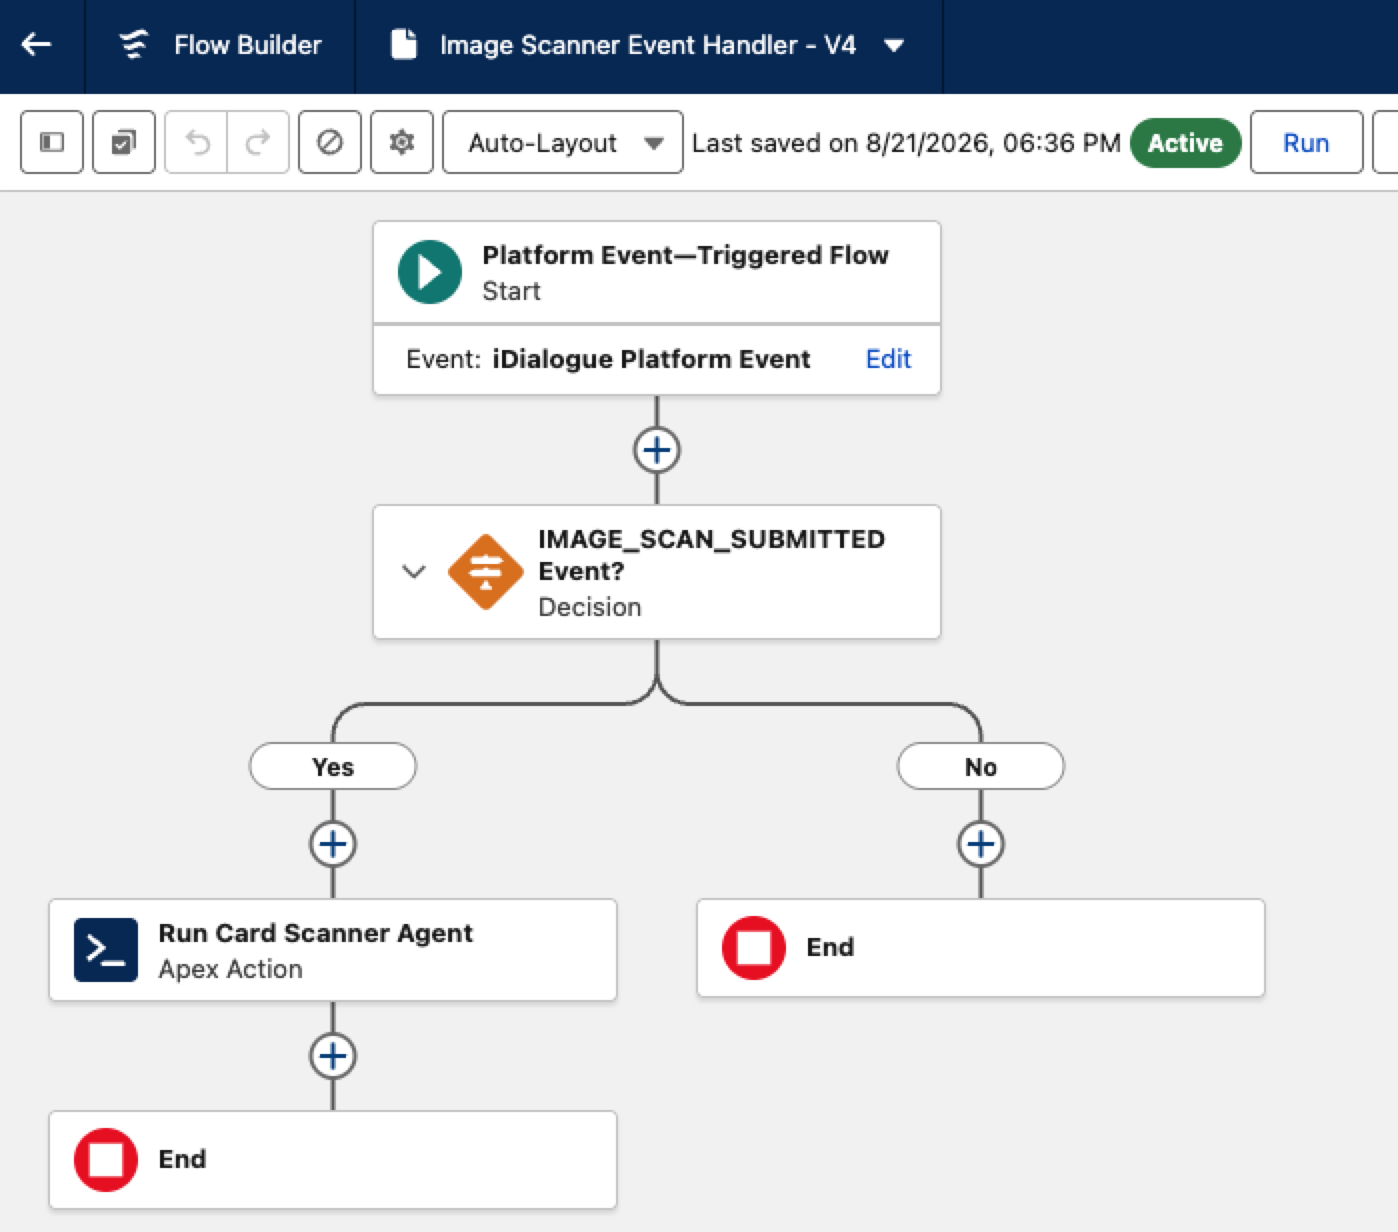
The Yes path handles IMAGE_SCAN_SUBMITTED; all other iDialogue event types end without running the agent.
Create the configured Flow
- In Salesforce Setup, enter
Flowsin Quick Find, and then select Flows. - Open Image Scanner Event Handler and create an editable Flow from the template. Depending on your Salesforce release, select the template from New Flow or open it and select Save As.
- Give the editable Flow an org-specific label and API name.
- Keep the Start event set to iDialogue Platform Event.
- Open IMAGE_SCAN_SUBMITTED Event? and keep this condition:
| Event field | Operator | Value |
|---|---|---|
Event Type (rooms__Type__c) |
Equals | IMAGE_SCAN_SUBMITTED |
- Open Run Card Scanner Agent.
- Replace the packaged
Business Card OCR Agentplaceholder with the exact name of the intended Agent Studio agent. If agent names are not unique, clear Agent Name and use the intended Agent ID instead. - Preserve the file, record, notes, and background mappings.
- Save the Flow.
- Before activation, review all active platform event-triggered Flows. Leave exactly one active handler for each scanner submission.
- Activate the configured Flow and test it with a safe record and safe agent.
The packaged template can be installed as Active. Before you activate an editable copy, deactivate the packaged handler or another handler that would also match the same event. Salesforce documents installed Flow status in Considerations for Flows Installed from Packages.
Preserve the Run Agent mappings
| Run Agent input | Image Scanner event value |
|---|---|
| Agent Name or Agent ID | The intended Agent Studio agent |
| Content Document ID | rooms__ContentDocumentID__c |
| Content Version ID | rooms__ContentVersionID__c |
| Supporting Content Version ID | rooms__SupportingContentVersionID__c |
| Record ID | rooms__RelatedRecordID__c |
| User Prompt | rooms__Message__c |
| Dialogue ID | Leave blank to start a new background dialogue. |
| Run in Background | true |
| Process File Before Running Agent | true |
| Eval Agent ID | Leave blank. This input is deprecated. |
The Front image supplies the primary Content Document and Content Version. The Back image supplies the optional Supporting Content Version. The user's notes become the initial User Prompt. The related Account, Contact, Opportunity, or other record remains separate from both file IDs.
For the complete action contract, see Run Agent Action (AI) Flow Reference.
Route submissions carefully
The provided Decision matches every IMAGE_SCAN_SUBMITTED event. If different agents handle different Salesforce objects, add Related Record Type (rooms__RelatedRecordType__c) conditions, such as Account or Contact, and make the routes mutually exclusive.
Component labels are not event fields. Two Image Scanner components on the same object cannot be routed by their Label, Front Side Label, or Backside Label. Use one compatible agent or another explicit routing design for that case.
Submit a scan
- Open the Salesforce record that contains Image Scanner.
- Under the Front label, upload a
.jpg,.jpeg,.png,.heic, or.heifimage. - If a Back slot is shown, optionally upload a Back image. It must be different from the Front image.
- Select Preview to review either Salesforce File.
- Select Replace or Retake when the wrong image is selected, and then upload the replacement.
- Enter optional notes or instructions for the agent. The limit is 4,000 Unicode characters.
- If the microphone is shown, select it, speak, and review or edit the recognized text. Select the microphone again to stop. The component does not store audio.
- Select Submit.
- Read the submission receipt. Processing continues in the background, so you can leave the page or select Scan Another.
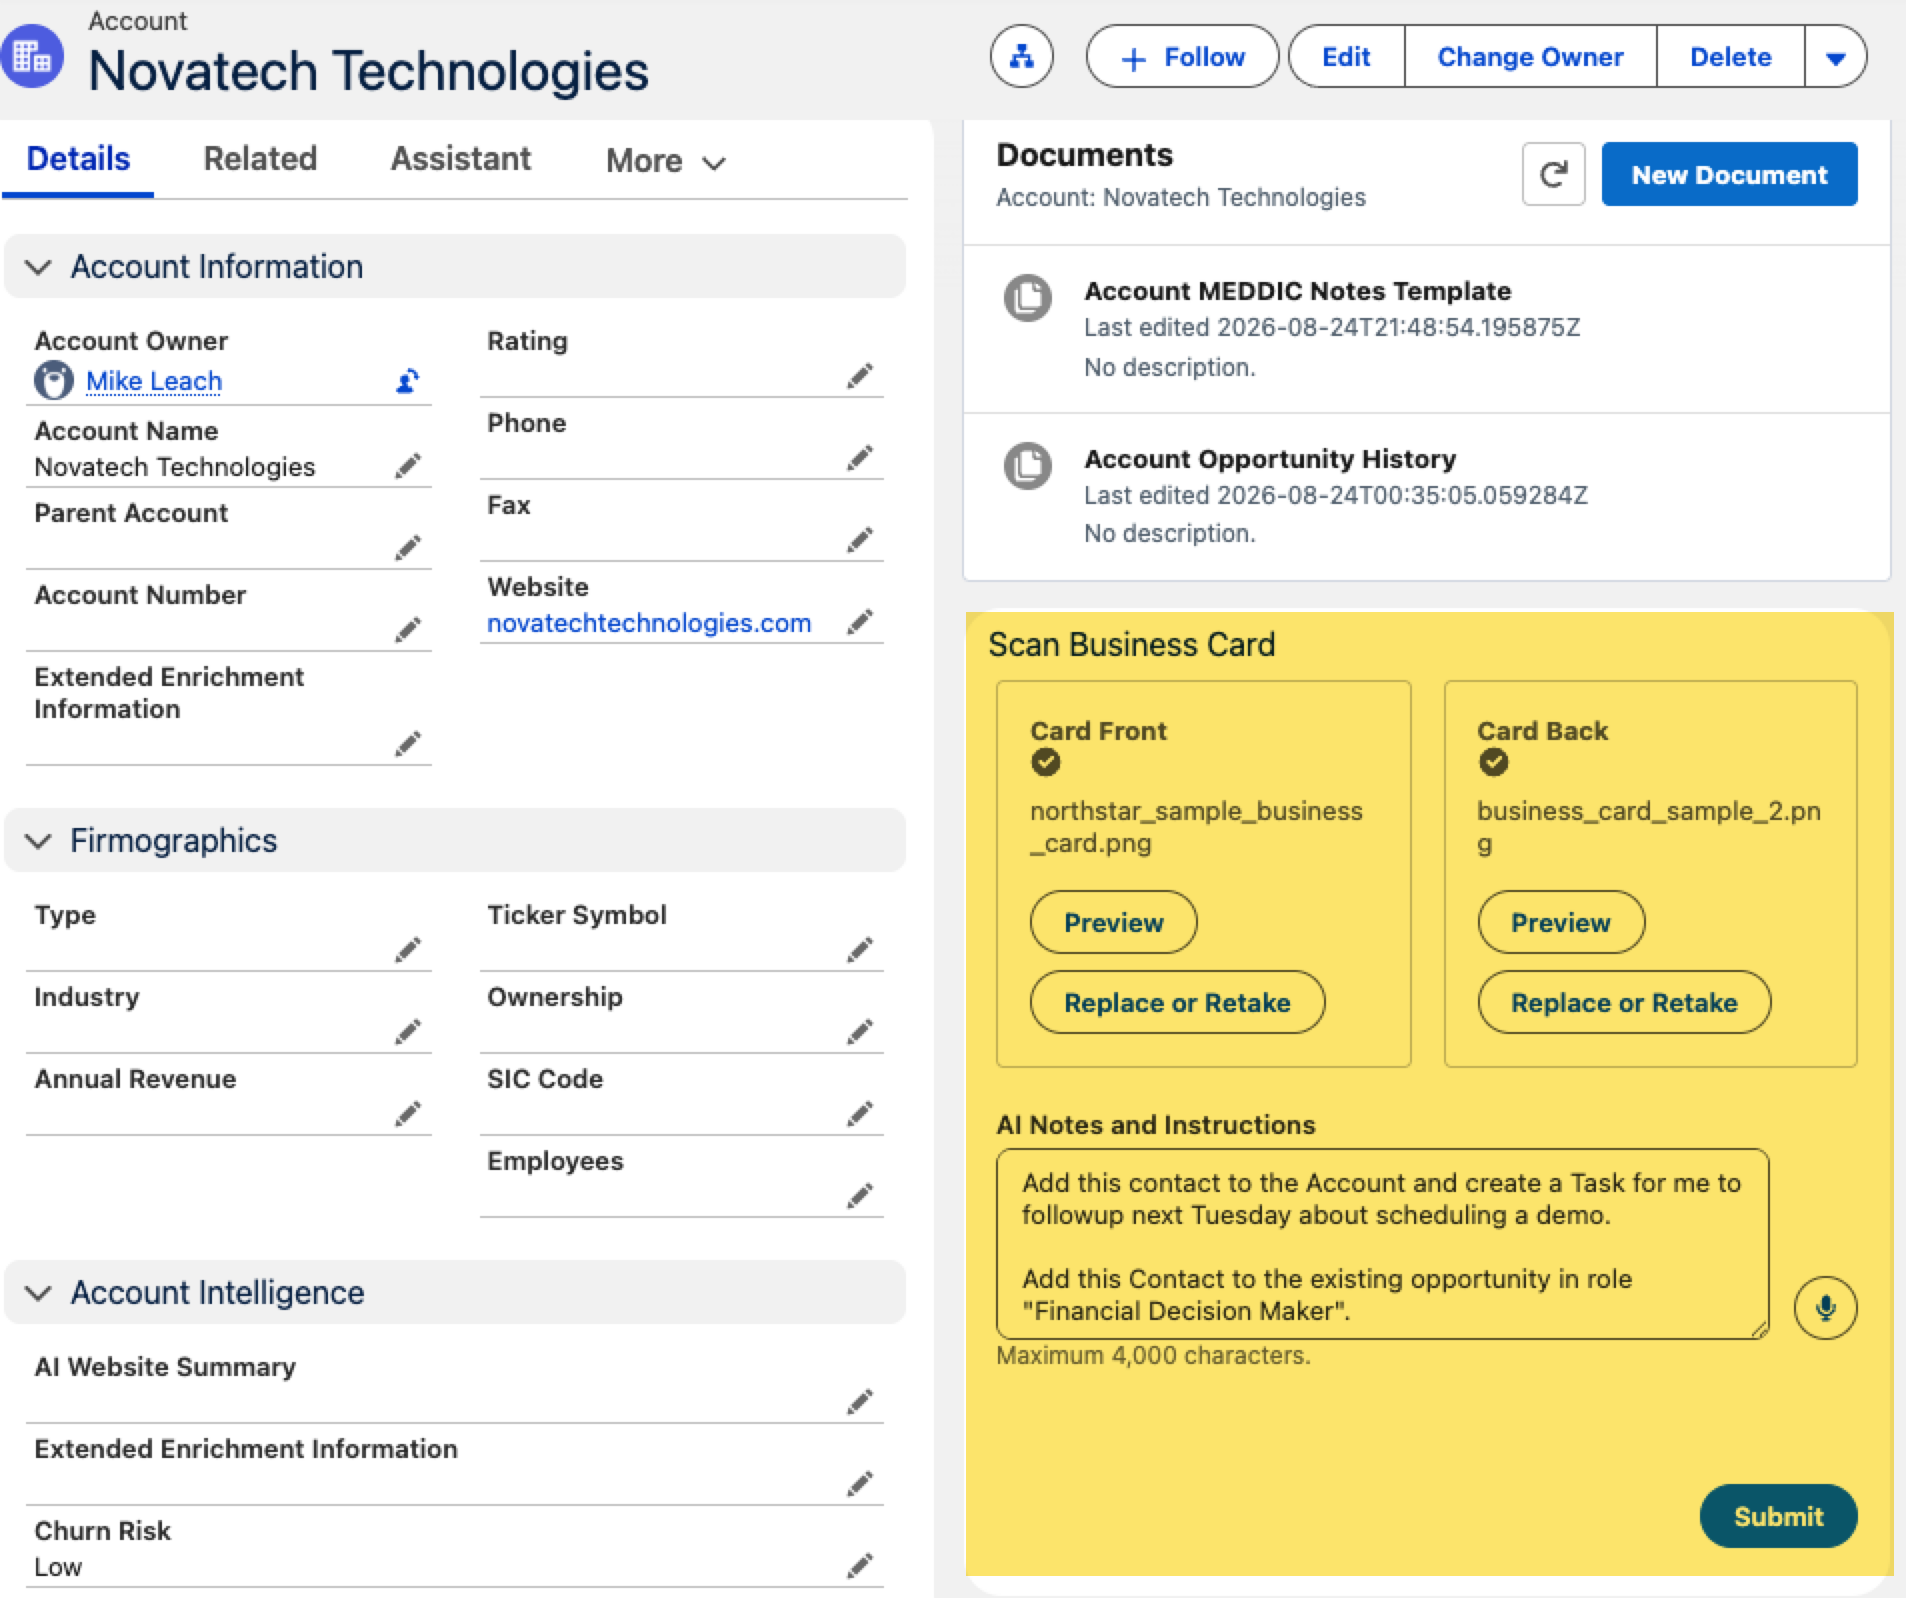
Review both images and the optional notes before selecting Submit.
The microphone appears only when the browser or Salesforce mobile environment supplies a compatible speech-recognition service. Type the notes when the microphone is not available or microphone permission is denied.
Understand uploaded Files
Each upload creates a private Salesforce File. It appears on the current record only after a successful Submit. Preview is available before Submit. The Front and optional Back keep their existing file IDs when they are attached.
Replace or Retake clears that image from the current scanner form. The replaced upload remains in your private Salesforce Files. An upload that you abandon without Submit also remains private. No automatic cleanup deletes these Files. Remove unwanted Files separately when your Salesforce permissions and retention rules allow it.
Scan Another resets the component after submission. It does not cancel background processing or delete the submitted Files from the record.
If a Back image is supplied, it must be a different Salesforce File from the Front. Each selected File must be readable and either already linked to this record or your own private upload. Submit validates the selected Files and adds the required record links before it publishes the event. Two-sided mode can submit Front without Back. One-sided mode ignores Back. The Account or other business record remains separate from both file IDs.
Verify the result
The submission receipt confirms that Salesforce accepted the Image Scanner platform event. It does not confirm that the Flow ran, OCR completed, the agent finished, or a Salesforce record changed. If the agent creates a completion Task, configure it to create that Task after successful processing. The receipt does not create a completion Task or confirm delivery of a mobile notification.
Use a test record and verify each stage:
- Before Submit, confirm that the images can be previewed and do not appear in Files on the business record. Confirm that the business-record
CONTENT_VERSION_INSERThandler does not process these private uploads. - After Submit, confirm that the selected images appear in Files on the correct record and exactly one active Flow matches
IMAGE_SCAN_SUBMITTED. - Confirm that the Flow reaches Run Card Scanner Agent.
- Confirm that the agent receives the correct primary image, supporting image, notes, and business record.
- Confirm that the agent uses only the expected All or Background tools.
- Review the expected dialogue, record update, task, file, or other business result.
- In iDialogue Admin, review iDialogue Events with Event Type equal to
ERRORwhen processing fails.
The absence of an error event does not prove completion. Verify the intended business result before retrying a submission.
Troubleshooting
| Problem | Action |
|---|---|
| Image Scanner is not available in Lightning App Builder. | Confirm that the installed package includes the component and that you are editing a Lightning Record Page. |
| Upload is disabled. | Confirm that the component has a current record ID and that the user can read the record and upload Files to it. |
| Submit is disabled. | Upload the required Front image. Stop voice input and wait for any upload or submission in progress. The Back image is optional. |
| The microphone is not shown. | Type the notes. The current browser or mobile environment does not provide compatible speech recognition. |
| Replace or Retake left a private File. | This is expected. Remove the unwanted File separately if your retention rules allow it. If it was attached before Submit, check the installed package version. |
| The scanner reports that it cannot submit. | Confirm that each File is readable and is your own private upload or is already linked to this record. Check permission to attach Files to the record, distinct Front and Back Files, and Apex and platform event access. |
| No agent result appears. | Confirm the exact event condition, agent selection, mappings, Background Model, connection, usage capacity, and active Flow. Review iDialogue Events for errors. |
| The agent runs more than once. | Keep one matching IMAGE_SCAN_SUBMITTED handler. Check the related-record conditions on CONTENT_VERSION_INSERT handlers and any native File Attach handler that runs when Submit adds the record links. |
| The wrong agent runs. | Check Agent Name uniqueness, use Agent ID when needed, and review mutually exclusive Related Record Type conditions. |
For general file-processing errors, follow the monitoring guidance in File OCR with Run Agent. If you need help, submit a support request.