
Use this guide to add diagrams to an Opportunity Lightning record page. Salesforce admins configure the page and agent. Sellers and sales leaders use the agent to create and revise diagrams.
Allow about 10 minutes for the first diagram after the prerequisites are complete. Installation and organization-wide rollout can take longer.
The agent is Sales Process Mapping Agent. Diagram Workspace displays its saved diagrams on the same record.
Before you start
Confirm these prerequisites:
- iDialogue is installed and connected. See Install and configure iDialogue.
- Diagram Workspace is available in Lightning App Builder.
- You can install agents and edit Lightning record pages.
- The test user has existing iDialogue access and Read access to the test Opportunity.
- The test user has Edit access to save changes, view history, restore revisions, or archive diagrams.
- You have a test Opportunity with enough information for a simple process map.
This guide applies to desktop Lightning record pages, not the classic Page Layout editor.
No separate Diagram permission set is required. Standard Salesforce record access still applies. Component visibility filters control where the component appears; they do not grant record access.
Do not add a new Trusted URL. The feature uses the existing packaged API Trusted URL.
1. Install the sales process agent
- Open the iDialogue Admin app.
- Open Agent Gallery.
- Find Sales Process Mapping Agent.
- Select Details to review the agent.
- Select Install.
- Review the installation preview.
- Select Install to confirm.
- Wait for Install Complete.
See Sales Process Mapping Agent for an overview, or browse the Agent Gallery.
In Salesforce Agent Gallery, search for Sales Process Mapping Agent to find the current package. For installation help, see Install agents.
2. Check the agent settings
- Open Agent Studio in the iDialogue AI app.
- Open the installed agent.
- If changes are necessary, select Edit in Settings.
- Set the values shown below.
- If you changed the settings, select Save.
- When the agent is ready for testing, select Published in Stage.
- Select Mark as Current Status to save the stage.
| Setting | Value |
|---|---|
| SObject Type | Opportunity |
| Audience | Internal |
| Display In AI Assistant Console | Enabled |
- In Skills, confirm that List Diagrams, Get Diagram, and Save Diagram are active.
- Confirm that each skill has Chat or All in Run Context.
The agent needs access to the record information used in the diagram. Related Tasks or other records need suitable context or query skills.
If settings or skills are missing, see Customize an Agent in Agent Studio.
3. Add the components to the record page
- Open the test Opportunity.
- From the Salesforce setup menu, select Edit Page.
- In Lightning App Builder, find Diagram Workspace in the component list.
- Drag it onto the page or into a tab, such as Sales Process.
- Select the component.
- Set Label to the required heading, such as Sales Process.
- If necessary, add standard filters under Set Component Visibility.
- If Agent Assistant is not on the page, add it.
- Select Save.
- Use Activation to assign the page to the required app, record types, and profiles.
- Return to the Opportunity.
The default workspace label is Diagrams. A wide page region gives large diagrams more space.
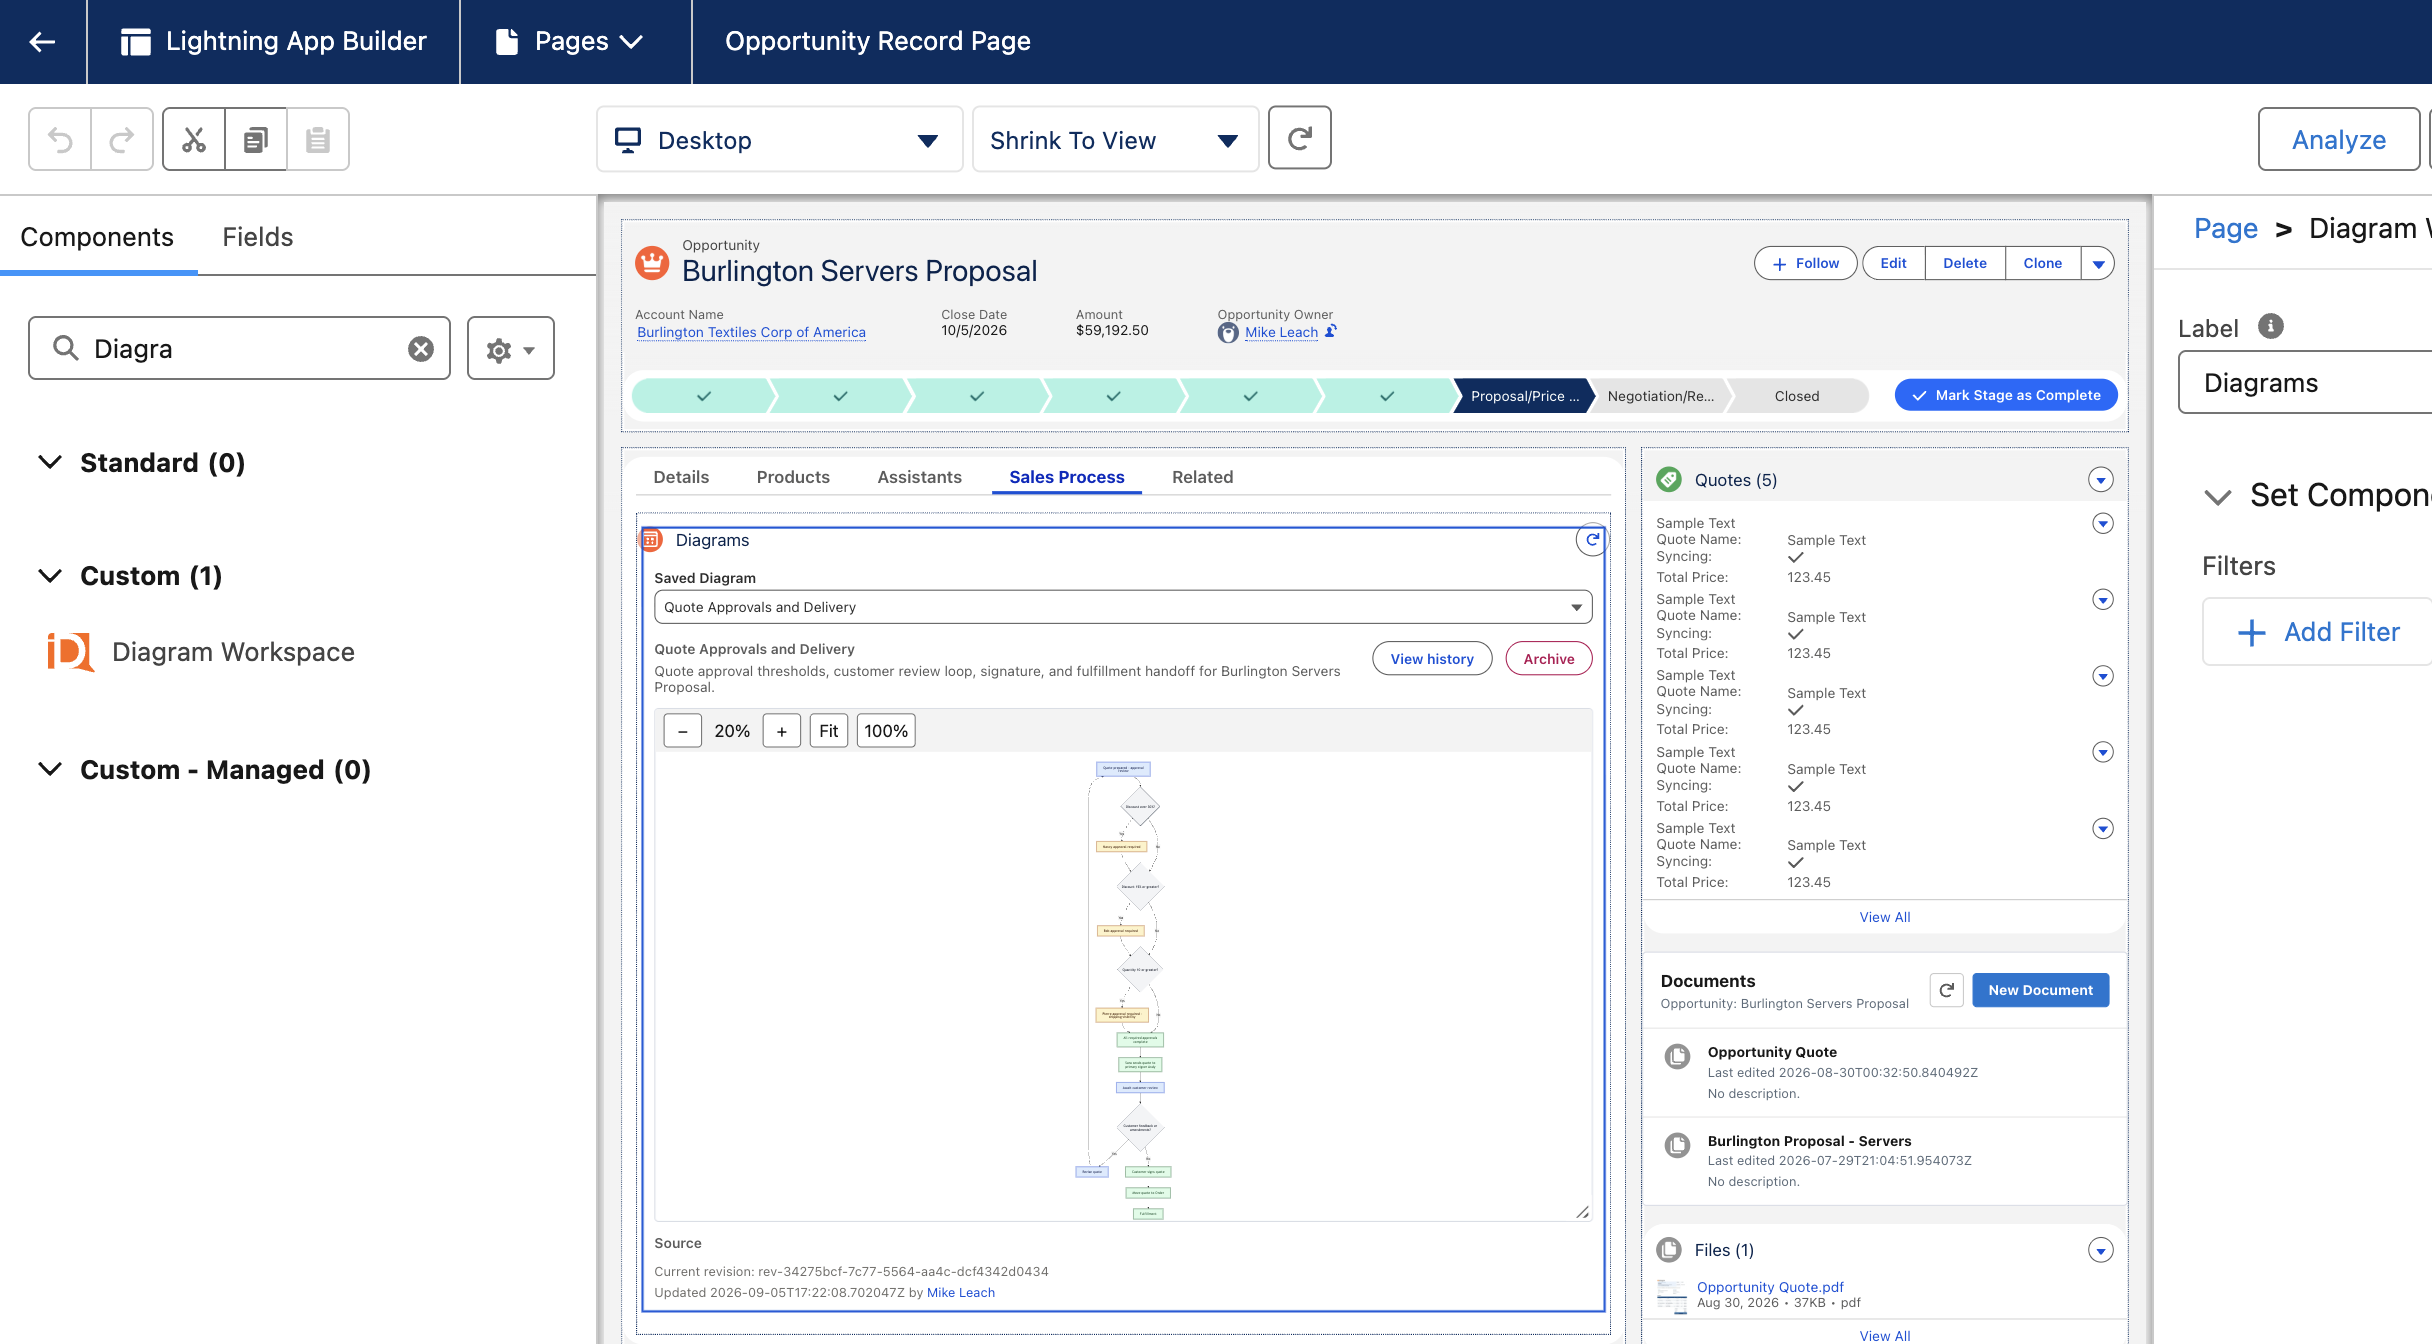
Example: Diagram Workspace in a Sales Process tab on an Opportunity record page.
4. Create the first diagram
- In Agent Assistant, select Sales Process Mapping Agent.
- Copy the prompt below into the conversation.
Create a qualification flowchart for this Opportunity using our MEDDPICC process.
Use available record facts. Mark missing evidence as Open.
Use green for Complete steps and amber for Open steps. Keep these words in the labels.
Ask about information you cannot confirm.
Describe the plan first. Do not save until I approve.
- Check the proposed steps against the Opportunity.
- Give the agent any missing facts or corrections.
- When the plan is correct, send: Approve and save this diagram.
- Open the workspace under your configured heading, such as Sales Process, on the same record.
- Confirm that the diagram is visible and correct.
A save confirmation means the revision was stored. It does not confirm that the viewer displayed it correctly.
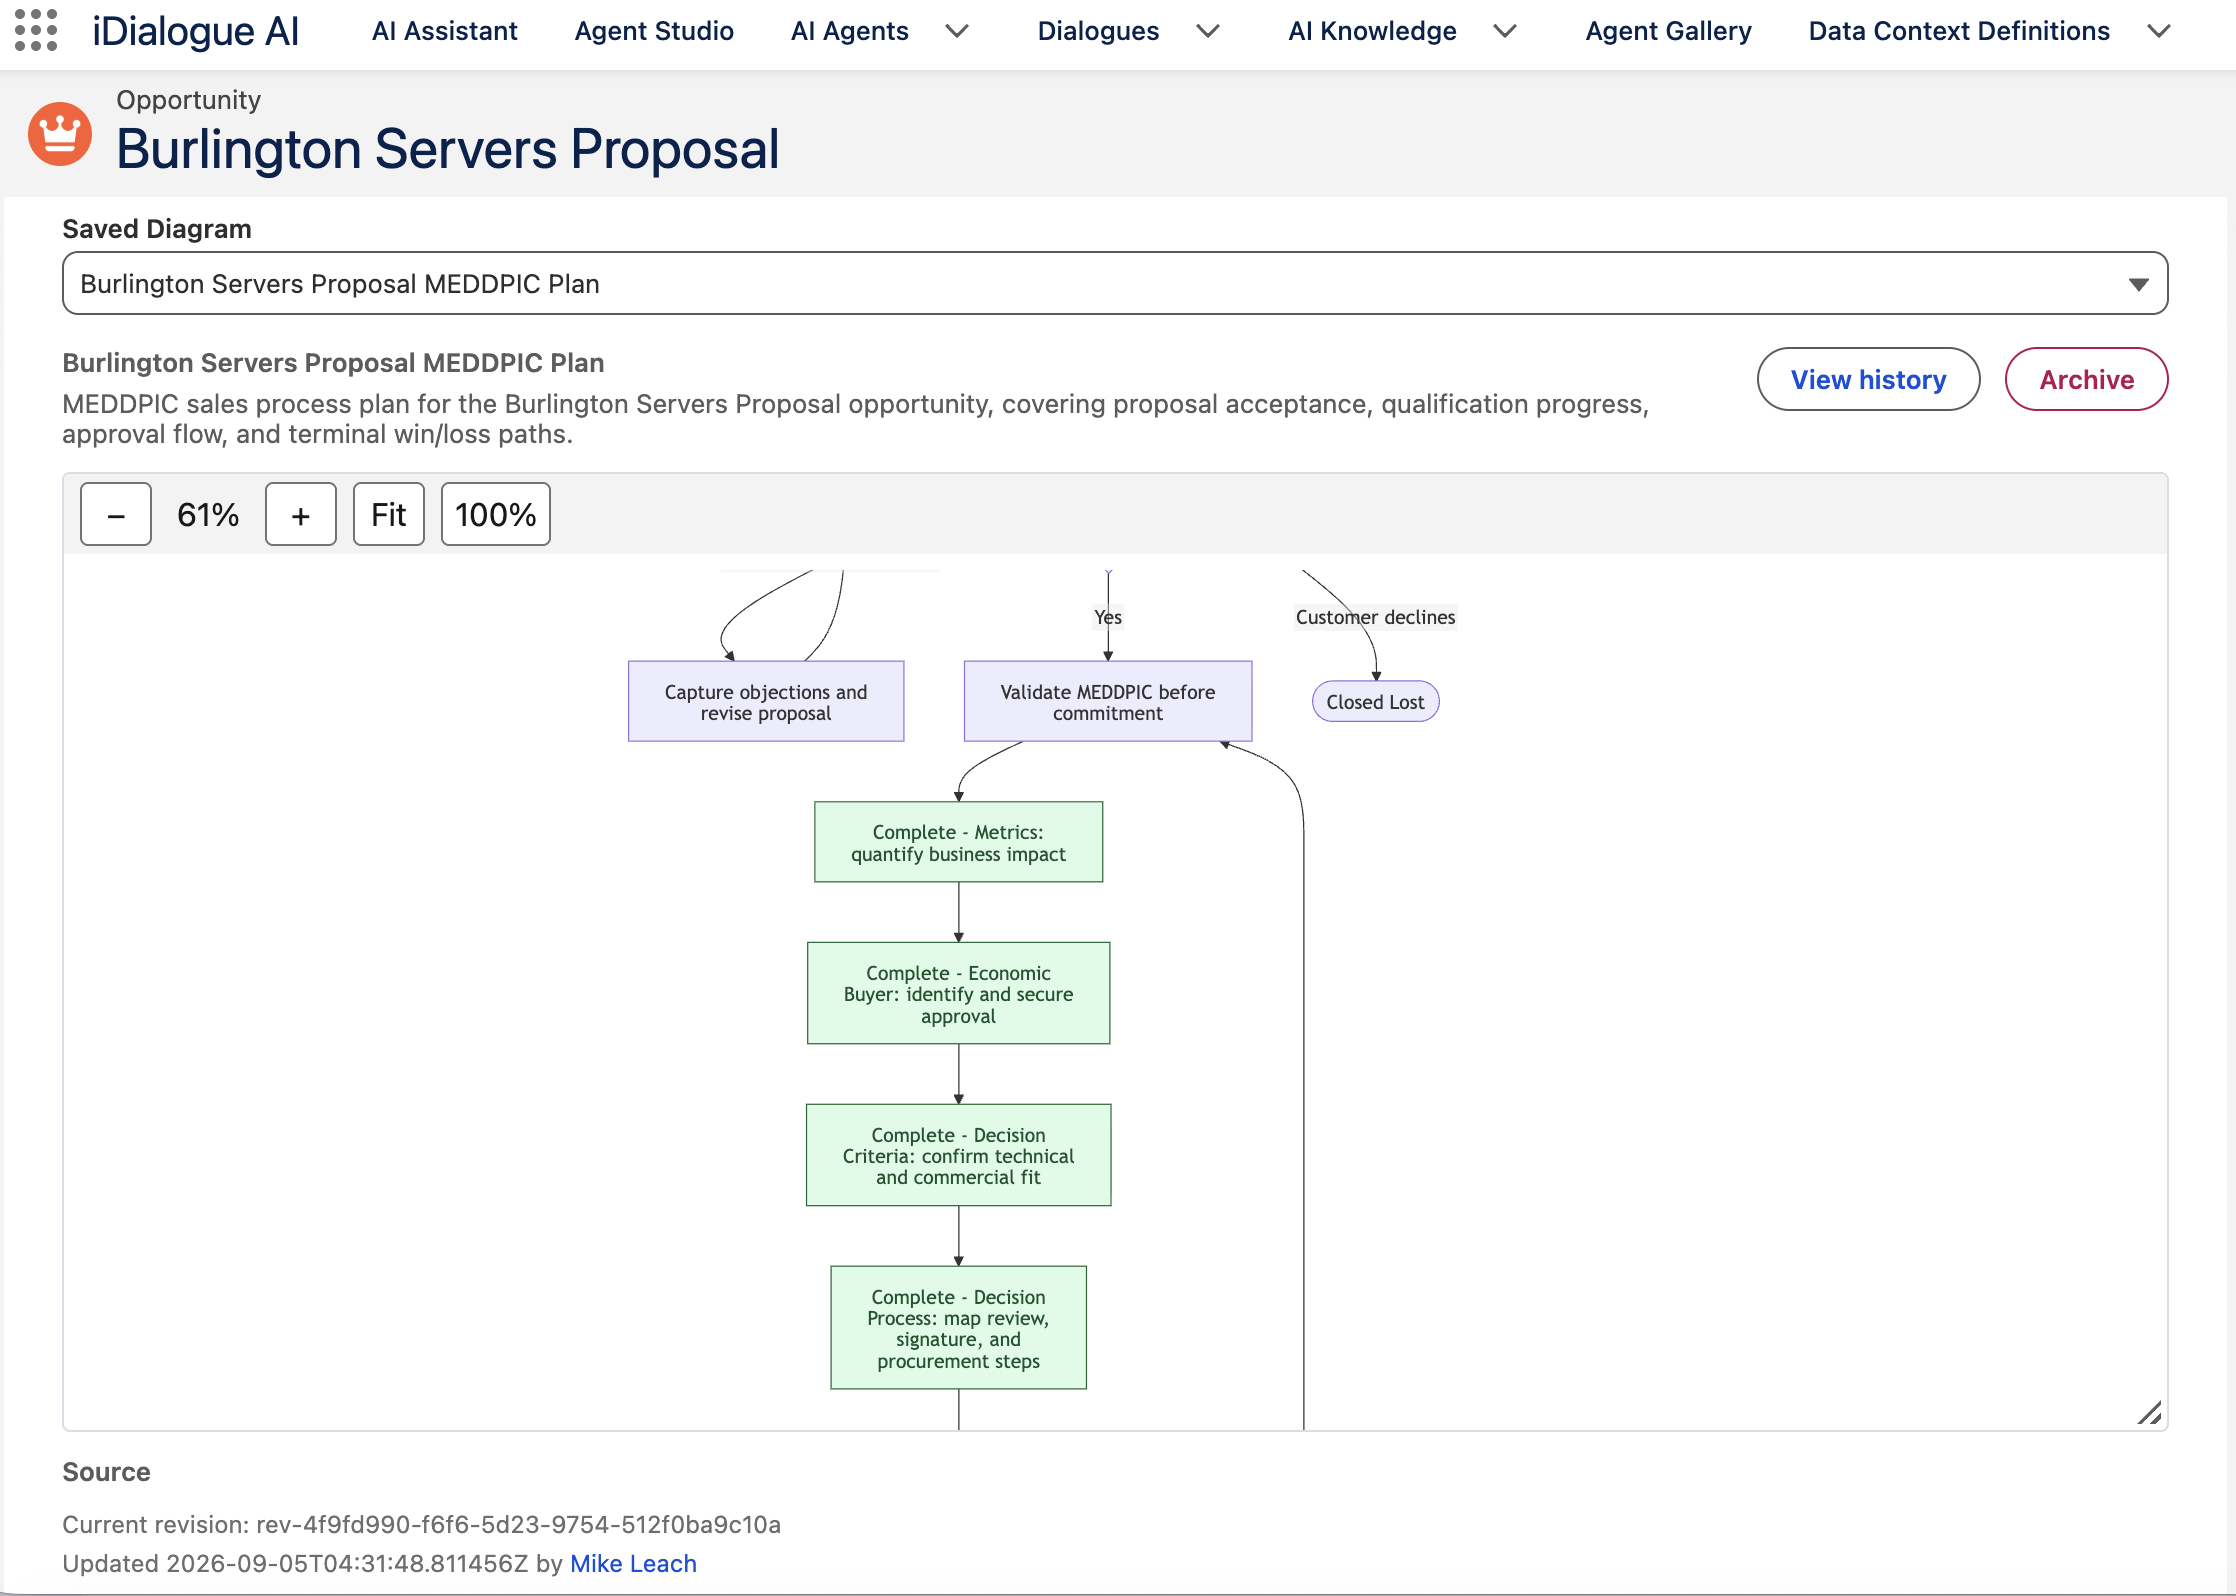
Example: completed qualification steps in a saved Opportunity process diagram.
5. View and revise diagrams
- To choose another diagram, use Saved Diagram.
- To see more saved diagrams, select Load more when available.
- To enlarge or reduce the diagram, use + or −.
- To show the whole diagram, select Fit.
- To use the original scale, select 100%.
- To move around the diagram, drag the canvas.
- To change the viewer height, drag its lower-right handle.
- To read the diagram text, expand Source.
Source is read-only. The current revision, update time, and available author name appear below it.
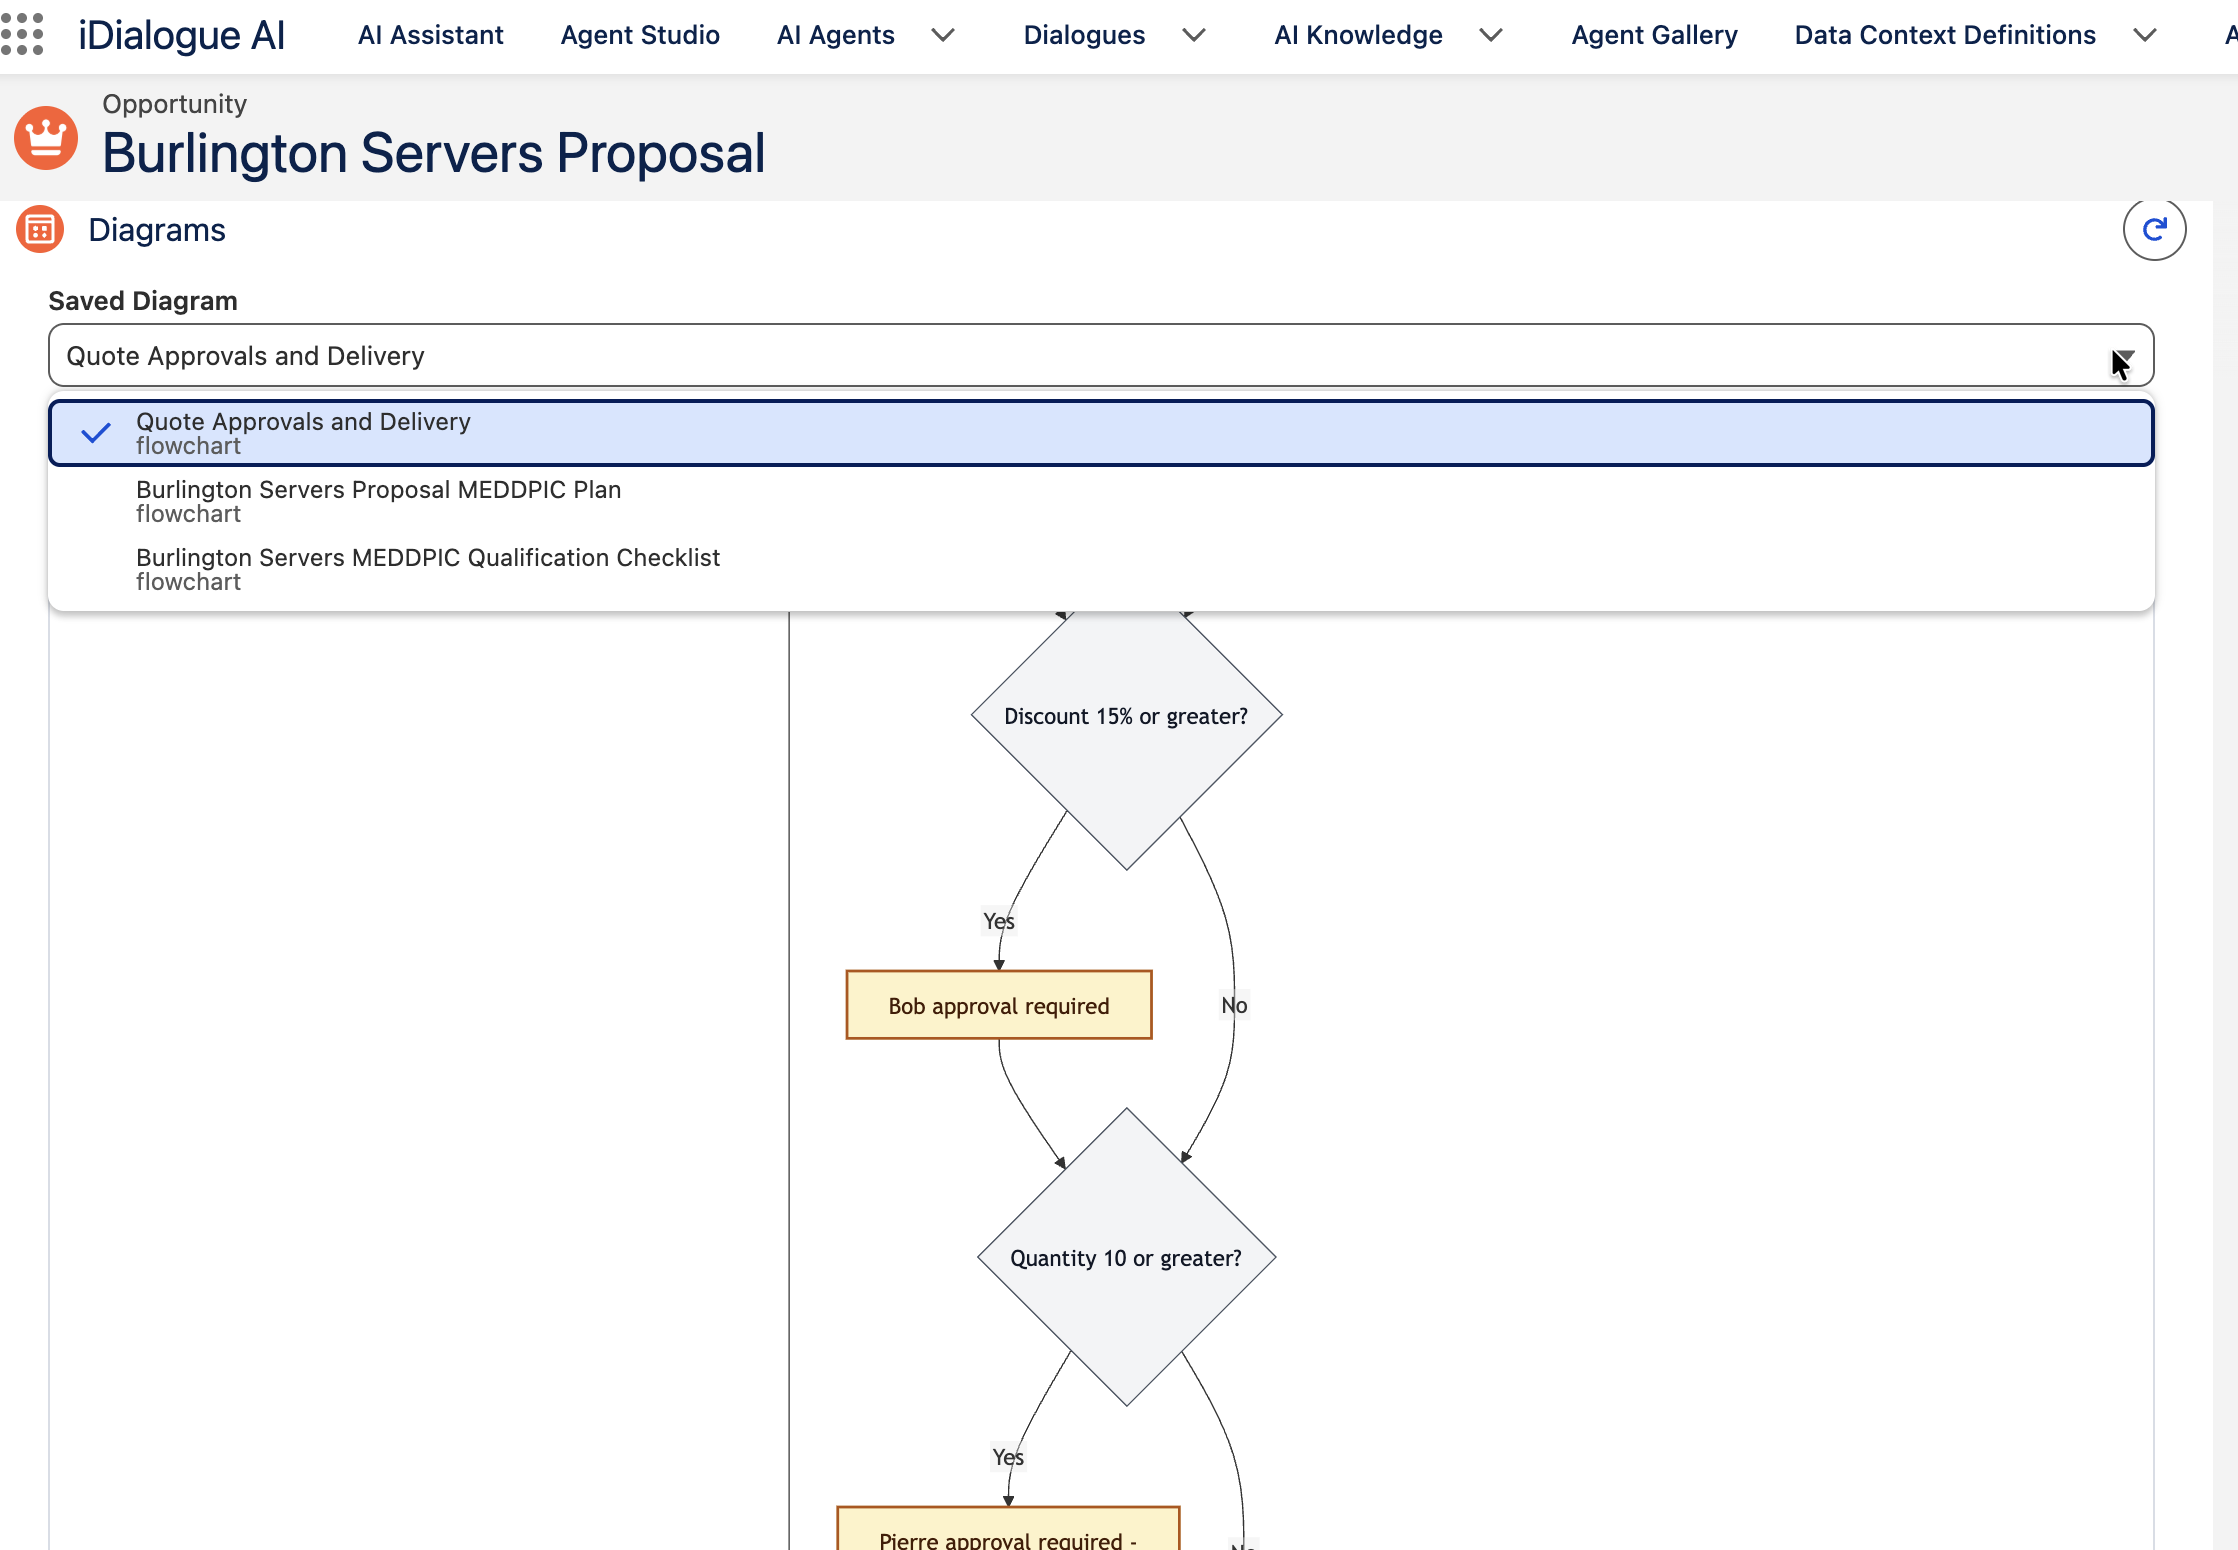
Example: one Opportunity can have separate qualification and quote approval diagrams.
The saved diagram is available in later conversations on the same Opportunity. It does not update automatically when Salesforce data changes.
To revise it in a new conversation, use this prompt:
Find the saved qualification diagram for this Opportunity and read its current version.
If more than one diagram matches, ask me to choose.
Check which qualification evidence changed since that version.
Describe the changes you recommend. Keep unrelated steps unchanged.
Ask me to confirm before you save a new revision.
To inspect earlier revisions, select View history. To use an earlier version, select Restore for that revision. Restore creates a new current revision and keeps the earlier versions.
To remove a diagram from the active list, select Archive. In the confirmation, select Archive Diagram. The saved revisions remain stored.
More prompts to copy
Use these prompts on the Opportunity that needs the diagram. Replace bracketed text before sending a prompt.
Quote approval flow
Create a quote approval flowchart for this Opportunity.
Use this approval policy: [paste the approved policy].
Show decisions, approver roles, customer review, and the signature step.
Ask about missing thresholds or approvers. Do not invent rules.
Describe the plan before saving. Do not submit any approvals.
Close plan
Create a close plan for this Opportunity from its current stage to signature.
Use known next steps, owners, dependencies, and dates.
Mark unknown owners or dates as To confirm.
Separate customer commitments from our proposed actions.
Describe the plan before saving. Do not change the Opportunity stage.
Buying team and decision roles
Create a stakeholder flowchart for this Opportunity using known contacts and decision roles.
Show the buyer, champion, reviewers, and approvers only when supported by available information.
Label unknown roles as To confirm.
Do not assume reporting relationships.
Describe the map before saving.
Task timeline
Create a timeline for this Opportunity using its available related Tasks.
Use actual dates and status. Ask me about missing start dates or dependencies.
Distinguish completed, active, and outstanding work with status labels and standard timeline colors.
Flag date conflicts. Do not change Tasks.
Describe the timeline before saving.
Guidance for sales leaders
- Choose a common diagram title and sales methodology for your team.
- Give the agent the approved process rules.
- Agree on status words and color meanings.
- Check missing evidence, owners, and next steps during deal reviews.
- Request a new revision when the facts change.
Flowcharts support color-coded elements. Timeline diagrams use standard planned, active, complete, and critical styles. Other diagram types use the standard theme. Status words keep the meaning clear without color.
Saving a diagram does not update Salesforce Tasks, approve quotes, or change Opportunity stages. Those actions remain separate workflows.
Troubleshooting
| Problem | Action |
|---|---|
| Diagram Workspace is missing from App Builder | Confirm that your installed iDialogue version includes the component. Contact your iDialogue administrator if an update is necessary. |
| The agent does not appear | Check Published stage, Opportunity type, Internal audience, and console display. Check the user's existing iDialogue access. |
| No diagrams appear | Confirm that the agent saved a diagram on this Opportunity. Select the workspace refresh icon. |
| A saved diagram does not display | Select the workspace refresh icon. If the error remains, ask the agent to check the saved diagram for source errors. |
| The diagram is too small | Use + or 100%. Drag the canvas or increase the viewer height. |
| The agent cannot find related Tasks | Check the agent's record context and query skills. Do not assume that missing data means no Tasks exist. |
| Save, history, restore, or archive is unavailable | Check the user's Edit access to the Opportunity and existing iDialogue access. |
The refresh icon uses your configured label, such as Refresh Diagrams or Refresh Sales Process.
If the problem remains, submit a support request. Include the failing step and visible error. Remove confidential information from screenshots.